Table of Content
What are the components that you have used here? I think tou havent mentioned all the components here and it will be great if you instruct me how to connect this device to our home circuit. Most relay boards are provided with 3 terminals for connection.
At the same time, the “D1 is ON” status print on the 16×2 LCD Display Module. How reliable is your voice recognition module? Do a project using the scientific method instead of the engineering design process. For example, pick a single command and repeat it 10 times at different distances from the microphone. You might also hear speech recognition referred to as voice recognition.
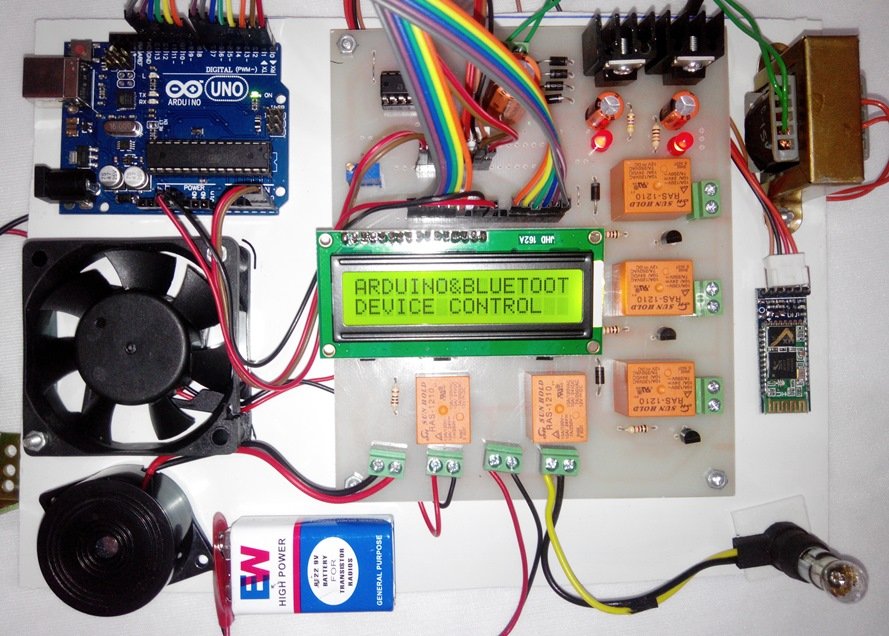
Circuit Diagram of Voice Control Home Automation using Arduino and Bluetooth Module HC-05
Some modules come unassembled and require soldering to attach header pins. If you do not have access to a soldering iron, make sure you purchase a module that does not require soldering. You will need more than one if you would like to control multiple appliances separately. This item is may also be available from other vendors like SparkFun and Adafruit. Click on the upload button to upload the code to the board.
Then click on it and select the Connect Robot option. Before doing this make sure, your smartphone has Paired with Bluetooth Module. If it not paired then find the HC-05 Bluetooth module in your phone Bluetooth settings and pair your phone with it. In this case, the HC-05 Bluetooth module asks for a pin code for pairing, usually, the pin code is 1234 or 0000.
Voice Controlled Home Automation project using Arduino
Once connecting speak to the arduino with the commands you had set for the lights and fan to be turned on and off. Then the same is read by arduino as strings and then it performs the switching function of household items with the help of relay circuit. Add the following lines in the setup() function to activate the serial port.
You will need to make some design choices and use the engineering design process to design your voice control system. Determine what features you need for your voice control system based on your plan. For example, if you want the system to work for everyone in your family, a speaker-independent module may be better. They may only work well when you are very close to them. That could be fine if you will use the device while sitting at a desk.
Working Voice Controlled Home Automation using Arduino
This function will be responsible for controlling the bulbs by comparing the received data with a predefined string. After completing the installation process, open the app and make sure the circuit is connected to the power supply and the Bluetooth module is on. Now click on the mic button to come on the app dashboard. The range of the LoRa modules will also be tested in New York City, where the path loss will be even more complex. We will likely see variations in range based on directionality and building heights - so the exploration of the true urban range of the LoRa wide area network will be tested and quantified.

The relay module for Arduino is one of the most powerful applications forArduinoas it can be used to control bothA.CandD.Cdevices by simply controlling the relay by giving 5V. A relay is basically a switch which is operated electrically by an electromagnet. A relay can be used to control high voltage electronic devices such as motors as well as low voltageelectronic devicessuch as alight bulbor a fan. The idea of home automation using human voice is an interesting. The proposed system is used to control home appliances using a voice-controlled Android device.
IEEE Account
Traditionally, most lights and household appliances have been controlled by manual switches and buttons. Today, though, many newer devices connect to the Internet, and they can be controlled from your phone or computer. Turn off light” voice command through the app. Again the Arduino gets this command through the Bluetooth module. This time the Arduino sends a High input voltage to the Input-1 pin of the relay module.
The battery is not replaceable which is why all the I Phone users you know have it plugged in all the time as the battery degrades. Android is open source software, manufacturers can modify the operating system to suit their respective needs and phones. This becomes a cheap and feasible alternative for the manufacturer, as opposed to developing an operating system in-house or hiring a software company to do it.
Also, we will use a Bluetooth app on our smartphone, which is helping to send our voice Command from our smart phone to the project circuit. After you have uploaded your code to the development board and have installed the application on your smartphone, open the application and connect it with the HC-05 Bluetooth module. You can speak an appropriate command as defined in the code. As a result, the bulbs will light up in response. The LCD will also display the current state of the three bulbs.
To do that we should "open the doors" of our router to properly route requests that are made outside of our local network. The LCD will display all the states of the three bulbs as they change at each command. Open the serial communication at a baud rate of 9600.
If we were to use the cited sensitivity of -146 dBm for each module, and a transmitting power of 30 dBm, plus an antenna of 5 dBi, we get a distance approximation of 30,000 km! However, if we go to the manufacturer’s datasheet, EBYTE claims an 8 km transmission range for the T30D module, and a 3 km range for the T20D module. Download grove_control_LED.ino and upload it to your Arduino. This is a slightly modified version of the example code that uses the commands "Turn on the light" and "Turn off the light" to control the Arduino's onboard LED. This loads the two commands you just recorded into memory for use with voice control.
Different modules can store different numbers of commands of varying length. For example, some may allow you to record full sentences, while others may only allow commands that are a second or two long. Some modules allow you to train new commands and some do not. Now that we have completed the loading process, we just have to do some work to improve the project, the most useful, is to make it accessible from a remote webserver.
Specify the pin as the first parameter and the mode as the second parameter. Specify the Arduino pins connected with IN1, IN2 and IN3 of 4 Channel Relay Module. These pins will control white, blue and green bulbs. Throughout this guide, we will use an android smartphone that will connect to our Arduino development board.
As you know, in order to communicate with the HC-05 Bluetooth module, we need to use a UART communication port of the Arduino board. Basically in home automation system we have a wireless switch to control different devices. But in this project we can control devices over our voice. Mega have 54 digital pins so we can connect vast number of devices using this board. In this project we can control a device by voice commands over Android APP. We use a Arduino MEGA board, but you can use any Arduino board. We are showing voice control home automation system to control appliances with own voice command an Android app IoTBoys.